
How to make glitter wine glasses
Project Ideas for Using Glitter Bought in Large Quantities
If you have a surplus of glitter and are looking for creative ways to use it, making glitter wine glasses is a fantastic craft project idea. Use acrylic paint to decorate the jars and add a touch of sparkle with the glitter. Not only will DIY glitter wine glasses allow you to showcase your artistic skills, but they also add a touch of sparkle to any occasion. Craft projects like glitter glasses are a great way to add some glitz and glamour to your celebrations. Here are some step-by-step instructions on how to make a simple art project using mirrors and jars. These art project ideas are perfect for anyone looking for a fun and creative activity.
- Gather the Materials: To get started, you’ll need wine glasses (preferably stemless), Mod Podge or another adhesive suitable for glass, a foam brush, painter’s tape, decoupage medium, paints, food coloring, and of course, glitter in the color(s) of your choice.
- Prepare the Glass: Clean the wine glasses thoroughly with soap and water to ensure they are free from any dirt or residue. Apply a clear varnish to the glass surface to give it a shiny mirror-like finish. Make sure to dry the water, paper, wax, and varnish completely before proceeding to the next step.
- Use painter’s tape to create clean lines or designs on the glass for a simple art project. This technique will help keep certain areas free of glitter when working with paints and paper. This step allows you to add simple art project patterns or sections using paper shapes without worrying about getting glue or glitter on those areas. Additionally, you can apply varnish for a finishing touch.
- Apply Adhesive: Use a foam brush to evenly apply varnish or another adhesive onto the desired area where you want the glitter to stick. Be sure not to apply too much adhesive, such as varnish or wax, as it may cause clumps when adding the glitter to the stick or paper.
- Sprinkle Glitter: Sprinkle an ample amount of glitter onto the adhesive-covered varnish while rotating and tapping gently on the glasses. This ensures even distribution and helps remove excess glitter.
- Let It Dry: Allow the painting glue and glitter to dry completely on the canvas or paper according to the manufacturer’s instructions before removing the painter’s tape.
- Seal the glitter wine glasses with Mod Podge (Optional): If desired, seal your glitter glasses art project by applying another layer of Mod Podge over the entire surface of the glass. This step helps to prevent the glitter paint from flaking off the piece of paper over time.
- Remove Painter’s Tape: Once the adhesive and glitter on the paper or canvas art project are completely dry, carefully cut and peel off the painter’s tape to reveal clean lines and designs.
- Enjoy Your Glitter Wine Glasses: Your beautifully embellished wine glasses, painted with vibrant colors and adorned with sparkling glitter, are now ready to be used for special occasions or as decorative pieces in your home. Have fun showcasing your artistic skills and creating a picture-perfect display with these unique and eye-catching glassware.
Using glitter paint bought in large quantities opens up a world of creative possibilities beyond wine glasses, allowing you to create stunning art projects on paper and other surfaces. Consider other project ideas such as painting glittery picture frames or glasses, customizing accessories like phone cases or keychains, or even creating a unique canvas piece. The options are endless!
Unique melted crayon art projects with glitter
If you’re looking for a fun and creative way to use paint and canvas, why not try incorporating glitter bought in large quantities into unique melted crayon art projects? This tutorial will show you how to create stunning artwork on paper. This exciting paint tutorial allows you to combine the vibrant colors of melted crayons with the sparkle and shine of glitter, resulting in stunning and eye-catching artworks on paper. It’s a fun technique that you can try at home. Here are some ideas for your next creative project involving paint. This tutorial will guide you through the process of creating beautiful art. The post includes images to inspire you along the way.
Melted Crayon Canvas with Glitter
Create a fun and mesmerizing piece of art by melting crayons onto a canvas using paint and paper, and adding a touch of glitter. Follow this tutorial to learn how to create this unique artwork. Start by arranging different colored paint and paper at the top edge of the canvas. Follow this tutorial to learn how to cut and create a beautiful artwork. Use a hairdryer on high heat to melt the crayons, allowing them to drip down the canvas for an art project. This paint tutorial involves using paper and the hairdryer to create a unique and colorful masterpiece. As the paint flows, sprinkle glitter onto the wet surface of the art project. The heat from the hairdryer will help adhere the glitter to the melted wax, creating a beautiful sparkling effect on your painted art project.
Glittery Melted Crayon Ornaments
Add some sparkle to your holiday decorations by making glittery melted crayon ornaments. This art project involves melting crayons and then painting them onto a piece of paper. Take a clear glass or plastic ornament and remove its top. This piece can be used for a fun art project. Break small pieces of various colored crayons and paint place them inside each ornament for an art project. Use paper to make the ornaments. Use a hairdryer or heat gun to melt the paint, swirling them around inside the ornament until they cover its entire interior surface. This art project tutorial will guide you on how to create a stunning piece. While still warm, sprinkle fine glitter paint into each ornament and gently shake it around to make a piece of art project for an even distribution. Allow them to cool completely before replacing their tops.
Glitter-infused Melted Crayon Rocks
Transform ordinary rocks into dazzling works of art with this simple DIY project. In this tutorial, learn how to make a stunning painted rock piece. Collect smooth rocks from your garden or purchase them from a craft store to make a fun art project. Paint each piece to create a unique and colorful rock art project. Arrange different colored crayon pieces on top of each rock and use a heat gun or oven set at low temperature to melt the paint until it covers the entire surface. With this method, you can make unique art pieces that only need a few materials. While still warm, sprinkle fine glitter onto the melted wax to make a piece of art and let it set. The art piece will need the glitter to adhere to the wax, adding a touch of sparkle to your painted rocks.
Glittery Melted Crayon Tote Bag
Personalize a plain canvas tote bag with paint, melted crayons, and glitter for a unique art piece that you need as a stylish accessory. Place a piece of cardboard inside the bag to prevent any paint bleed-through. This is especially important if you are working on an art project and need to protect the surface. Arrange crayon pieces in your desired pattern or design on the bag’s surface. If you need to add some color, you can use paint or other art supplies. Use an iron on low heat to melt the crayons, moving it slowly over the arranged art pieces until they melt and create colorful streaks of paint. This is all you need to create a beautiful and vibrant piece of art. While still warm, sprinkle glitter onto the melted wax for an extra touch of glamour in your art. You will need paint and art supplies to complete this project.
Decoupage techniques for chairs and tables using glitter
Decoupage is a popular art technique that involves decorating objects by adhering paper cutouts or images onto surfaces using paint. If you want to create beautiful decoupage art, you will need the right materials and tools. By incorporating glitter into your art and paint decoupage projects, you can add a touch of sparkle and create stunning pieces of furniture. Here are some creative art project ideas and inspiration for using glitter in large quantities to transform chairs and tables. With these ideas, you can unleash your artistic need and create stunning glitter-infused furniture pieces.
1. Glitter Accent Chair
Transform an ordinary chair into a stunning work of art that will make a bold statement with the addition of glitter accents. You need just a few simple steps to create this dazzling masterpiece. To start, you will need to select a chair that has a smooth surface. Consider choosing a chair made of wood or plastic. Choose an art color scheme that complements your existing décor or adds a pop of contrast. Art is a need. To create a stunning art piece, you will need to apply decoupage glue to the desired areas. Next, sprinkle generous amounts of glitter over the glue while it’s still wet. Allow the art to dry completely before sealing with another layer of decoupage glue to ensure longevity. This is a crucial step that you need to follow.
2. Sparkling Tabletop
Elevate the look of your table with glitter decoupage techniques, adding a sparkling art to your tabletop. To create a smooth base for adhering the glitter to the table, you will need to begin by sanding down the surface. This is an important step in the art of glitter application. To create a beautiful piece of art, you will need to apply a layer of decoupage glue evenly across the tabletop, working in small sections at a time. Sprinkle the art glitter onto the glued areas, making sure to cover all art surfaces thoroughly. Once dry, seal the glitter with additional layers of decoupage glue for durability and protection in art.
3. Ombre Glitter Furniture
Create an ombre effect on your furniture using different shades of glitter. This art technique adds a touch of sparkle and glamour to your home decor. This technique works particularly well on chairs with multiple slats or tables with intricate designs. Start by selecting two or more shades of glitter that blend harmoniously together, such as silver and gold or pink and purple. Apply decoupage glue to each section or slat individually, starting with one shade at the top and gradually transitioning to the next shade. Sprinkle the corresponding glitter onto each section of the artwork, ensuring a smooth gradient effect in the art.
4. Glittered Drawer Fronts
Add a touch of glamour to your furniture with glittering art on the drawer fronts. This art technique works wonders on art dressers, art side tables, or art cabinets with multiple art drawers. Remove the art drawer fronts and lightly sand them to create a smooth surface for better adhesion. Apply decoupage glue evenly across each drawer front to create a stunning art effect. Sprinkle glitter generously over the glued areas for an added touch of artistic flair. Allow the art to dry completely before reattaching the drawer fronts to the furniture.
5. Glittered Chair Legs
Transform plain chair legs into eye-catching art features by covering them in glitter.
Painting surfaces with glitter for a sparkling finish
Add Some Sparkle to Your Surfaces
If you’re looking for a creative art project idea that will instantly transform your space, consider painting surfaces with glitter. Whether it’s a piece of furniture, a wall, or even an accessory, adding glitter can bring a touch of glamour and sparkle to any room. This is especially true for art lovers who appreciate the beauty and creativity that art can bring to a space. With glitter, an essential art supply, available in large quantities, you have plenty of opportunities to experiment and create stunning art designs.
Transforming Furniture with Glitter
One exciting way to use glitter in art is by transforming furniture pieces into dazzling focal points. Start by selecting a chair or table that needs a fresh look. Prepare the art surface by sanding it down and applying a primer if necessary. Once the art surface is ready, mix your chosen color of paint with glitter in large quantities. Apply the art mixture evenly using an art brush or art roller, making sure to cover every inch of the art surface.
The result? A stunning piece of art furniture that catches the light and adds an element of glamour to your space. Imagine sitting on a sparkling art chair or placing art items on top of a shimmering art table – it’s like having your own personal touch of art magic in your home.
Creating Glitter Accent Walls
If you want to make an even bolder statement in your art, consider creating a glitter accent wall. Choose one wall in the room where you want to add some art and apply paint mixed with glitter from floor to ceiling. The reflective properties of the glitter will enhance the art and create an eye-catching feature that instantly elevates the entire space.
A glitter accent wall is a perfect way to incorporate art into bedrooms, living rooms, or even bathrooms, adding a touch of pizzazz to your space. Art creates depth and texture while also providing an element of surprise when someone enters the room.
Adding Sparkle to Accessories
Don’t limit yourself to just furniture and walls – there are numerous ways to incorporate glitter into smaller art accessories as well. For example, you can use glitter to transform plain picture frames into dazzling works of art. Apply a layer of glue or Mod Podge to the art frame, sprinkle art glitter over it, and let it dry. The result is a beautiful frame that adds a touch of sparkle to any photo or artwork.
You can also use glitter to enhance other art accessories such as vases, candle holders, or even lampshades. By adding art and glitter accents to these items, you can create a cohesive and glamorous art look throughout your space.
Sealing techniques to preserve the sparkle of glitter crafts
Preserving the Sparkle
To ensure that your art glitter crafts retain their sparkle and shine for a long time, it is essential to use proper sealing techniques. Sealing not only protects the art glitter from flaking off but also adds a layer of durability to your art project.
Mod Podge Sealant
One popular option for sealing art projects, such as glitter crafts, is using Mod Podge sealant. Mod Podge is a versatile adhesive and sealant that can be used on various surfaces, including paper, wood, fabric, and art. To seal your art project with Mod Podge, simply apply a thin layer over the glittered area using a foam brush or sponge brush. Allow the art to dry completely before applying additional coats if desired.
Clear Spray Sealant
Another effective method for sealing art glitter crafts is by using a clear spray sealant. This type of art sealant comes in an aerosol can and provides an even and smooth finish for your artwork. To use clear spray sealant for art, make sure you are in a well-ventilated area and lay down some protective covering to prevent overspray. Hold the art can about 8-12 inches away from your art project and apply thin, even coats until you achieve the desired level of art coverage.
Epoxy Resin
For more advanced art projects or items that require extra protection, epoxy resin can be an excellent choice for sealing glitter crafts. Epoxy resin is an essential material for creating art. It forms a thick, glossy finish that effectively seals in the glitter, while also providing enhanced strength and durability. Art is commonly used on tabletops, jewelry pieces, and other high-use art items. However, keep in mind that working with epoxy resin, an essential material for art projects, requires careful measuring and mixing according to the manufacturer’s instructions.
Tips for Successful Sealing
When sealing your art crafts, there are a few tips you should keep in mind to ensure successful results with glitter.
- When working with art, it is important to apply thin layers. Whether you are using Mod Podge, clear spray sealant, or epoxy resin, applying thin layers is crucial. Thick layers of art can result in a cloudy or uneven finish.
- Allow proper drying time for your art: Each sealing method in art requires adequate drying time between coats and before handling the finished project. Rushing this art step can lead to smudging or damage to the glitter.
- Before sealing your entire glitter art project, it is advisable to test the chosen sealant on a small, inconspicuous area first. This will help you determine if the sealant reacts negatively with the art glitter or base material.
- Consider multiple coats of sealant for your art: Depending on the level of protection and shine you desire, applying multiple coats of sealant may be necessary.
Creative ideas for incorporating glitter into various crafts
The possibilities are endless. Whether you’re working on a school project, DIY home decor, or handmade gifts, art glitter can add a touch of sparkle and glamour. Here are some creative art project ideas and inspiration for using large quantities of glitter in your artwork.
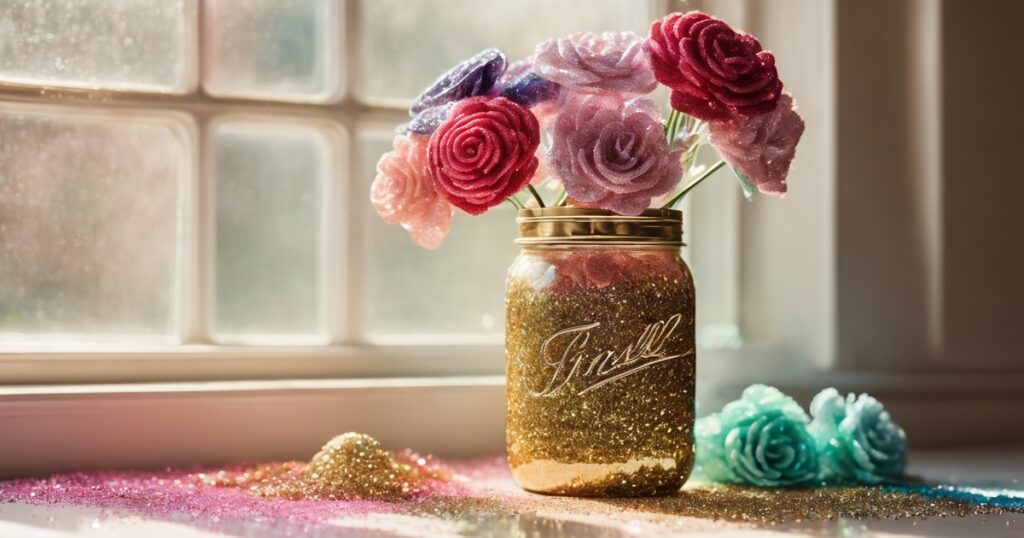
1. Glitter Jars and Bottles
One fun way to incorporate art and glitter into your crafts is by creating glitter jars or bottles. Fill clear glass containers with a mixture of water, glue, and an ample amount of glitter to create beautiful art. You can choose different colors of glitter to create a mesmerizing effect in your art. These sparkling art jars make beautiful art decorations for your room or as art gifts for friends and family.
2. Glitter Cards and Invitations
Add some glitz to your greeting cards or invitations by incorporating art and glitter into the designs. Use adhesive spray or glue pens to create intricate patterns or write messages with glue before sprinkling the desired color of glitter over it. This technique is a popular choice in the world of art. The art result will be stunning art cards that catch the light and grab attention.
3. Glitter Artwork
Create unique artwork by incorporating glitter into your paintings or drawings. Mix loose glitter with acrylic paint or apply it on top once the art painting is complete for added texture and shine. Experiment with different art techniques such as splattering, blending, or creating gradients with various shades of glitter.
4. Glitter Accessories
Give your accessories a glamorous art makeover by adding touches of glitter. Apply adhesive glue to plain hairpins, headbands, phone cases, or even shoes before sprinkling them with fine or chunky glitters in complementary colors. This art project allows you to add a touch of sparkle and creativity to everyday objects. This simple addition can transform ordinary items into eye-catching fashion statements.
5. Glitter Candles
Enhance the ambiance of any space by decorating plain candles with shimmering glitters. Apply a layer of adhesive glue onto the candle’s surface and roll it in a tray filled with glitter. You can choose a single color or mix different shades to create an ombre effect. These glittery candles make perfect centerpieces for parties or cozy home decor.
6. Glitter Slime
Slime-making has become incredibly popular, and adding glitter takes it to the next level. Create your own slime by mixing glue, borax, and water, then sprinkle in generous amounts of glitter. The result is a squishy and sparkly creation that kids (and adults) will love playing with.
7. Glitter Nails
Give your nails a dazzling makeover by incorporating glitter into your manicures.
Designing and decorating glitter shoes with style
If you’re looking for a fun and creative project idea using glitter bought in large quantities, why not try designing and decorating your own glitter shoes? It’s a fantastic way to add some sparkle and personal flair to your footwear. Here are some tips and ideas to get you started:
Choosing the Right Shoes
The first step is selecting the right pair of shoes. Opt for a plain canvas or fabric shoe that will provide a good surface for the glitter to adhere to. Sneakers, flats, or even high heels can all work well depending on your style preferences.
Preparing Your Shoes
Before applying glitter, it’s essential to properly prepare your shoes. Start by cleaning them thoroughly with soap and water to remove any dirt or debris. Once they’re dry, use masking tape or painter’s tape to cover any areas you don’t want to be covered in glitter, such as the soles or certain design elements.
Applying Glue
To ensure that the glitter adheres properly and stays in place, apply a layer of glue onto the areas where you want the glitter to stick. You can use craft glue or fabric glue for this step. Make sure to spread an even layer of glue without leaving any gaps.
Adding Glitter
Now comes the fun part – adding the glitter! Sprinkle generous amounts of glitter onto the glued areas of your shoes while making sure they are fully covered. You can use one color of glitter for a cohesive look or experiment with multiple colors for a more vibrant effect. Gently press down on the glitter with your fingers to ensure it adheres firmly.
Sealing and Finishing Touches
Once you’re satisfied with how your shoes look, it’s time to seal them so that the glitter stays put. Apply another layer of glue over the entire surface area where you’ve applied the glitter. This will act as a sealant and prevent the glitter from flaking off. Allow the shoes to dry completely before wearing or handling them.
Customizing Your Design
If you want to take your glitter shoes to the next level, consider adding some additional design elements. You can use fabric markers or paint to create patterns, add embellishments like rhinestones or beads, or even experiment with different textures by incorporating lace or ribbon.
Show Off Your Sparkly Creations
Once your glitter shoes are complete, it’s time to show them off! Wear them with pride and let your creative designs shine. Whether it’s for a special occasion or just everyday wear, your personalized glitter shoes are sure to make a statement and turn heads wherever you go.
Creating beautiful resin bangles embellished with glitter
Fun and Unique Project Ideas for Using Glitter in Bulk
If you’re looking for a creative project that allows you to showcase your artistic skills and add some sparkle to your accessories, then creating resin bangles embellished with glitter is the perfect choice. This project combines the beauty of resin jewelry with the eye-catching appeal of glitter, resulting in stunning pieces that are sure to turn heads.
1. Resin Bangles: The Perfect Canvas for Glitter
Resin bangles provide an excellent base for incorporating glitter into your designs. These sleek and stylish bracelets can be customized to suit any personal style or occasion. By infusing them with glitter, you can create unique pieces that reflect your individuality and add a touch of glamour to any outfit.
2. Choosing the Right Glitter
It’s essential to choose high-quality options that will withstand the test of time. Opt for fine or ultra-fine glitters as they tend to work best in resin projects. Consider using holographic or iridescent glitters to achieve a mesmerizing effect when light hits the surface of your bangle.
3. Mixing Glitter into Resin
To incorporate glitter into your resin bangle, start by preparing a small amount of clear resin according to the manufacturer’s instructions. Once mixed, gradually add the desired amount of glitter and stir gently until evenly distributed throughout the mixture. Remember not to overmix as this may cause air bubbles.
4. Pouring Resin into Bangle Molds
After mixing the glitter with resin, carefully pour it into silicone molds designed specifically for making bangles. To ensure a smooth finish, tap or gently shake the mold to release any trapped air bubbles before allowing it to cure according to the recommended time frame provided by the resin manufacturer.
5. Demolding and Finishing Touches
Once the resin has fully cured, gently remove the bangle from the mold. If there are any rough edges or imperfections, you can use sandpaper or a nail file to smooth them out. Consider adding additional layers of clear resin over the glittered surface to create depth and enhance the overall appearance of your bangle.
Creating resin bangles embellished with glitter is not only a fun and rewarding project but also an opportunity to express your creativity. Whether you choose to make them for yourself or as gifts for loved ones, these unique accessories are sure to make a statement wherever they go.
Craft your own glamorous clutch using glitter
Glitter is a versatile and dazzling material that can add a touch of glamour to any project. If you have bought glitter in large quantities and are looking for creative project ideas, why not consider crafting your own glamorous clutch? This unique accessory will not only make a statement but also showcase your personal style. Let’s explore some inspiring ideas on how to incorporate glitter into your clutch-making process.
1. Customized Clutch Design
Start by selecting a plain clutch or creating one from scratch using fabric or leather. Consider the shape, size, and color that best suits your taste. Once you have the base ready, it’s time to unleash your creativity with glitter. You can apply the glitter directly onto the fabric or use glue to create intricate designs like swirls, stars, or even personalized initials.
2. Gradient Glitter Effect
For an eye-catching look, experiment with a gradient glitter effect on your clutch. Begin by applying a thin layer of adhesive glue on one end of the clutch and sprinkle fine glitter over it. Gradually increase the amount of glitter as you move towards the opposite end, creating a beautiful ombre effect.
3. Embellishments and Accents
Enhance the overall aesthetic appeal of your clutch by incorporating additional embellishments and accents alongside the glitter. Consider attaching rhinestones, sequins, beads, or even small mirrors for added sparkle and dimension. These elements can be strategically placed around the edges or used to create patterns that complement the glitter design.
4. Color Combinations
Experiment with different color combinations to create unique and visually striking clutches using your bulk-bought glitters. Mix contrasting colors like gold and black for an elegant evening look or opt for vibrant shades like turquoise and fuchsia for a bold statement piece.
5. Protective Coating
To ensure longevity and prevent the glitter from shedding, it is essential to apply a protective coating. Consider using a clear sealant or varnish specifically designed for fabric or leather. This will not only protect your clutch but also give it a glossy finish, enhancing the overall appearance.
6. Personalized Touch
Add a personalized touch to your clutch by incorporating elements that reflect your personality or interests. You could attach small charms, pendants, or trinkets that hold sentimental value or represent something meaningful to you. This will make your clutch truly one-of-a-kind and serve as a conversation starter.
Crafting your own glamorous clutch using glitter bought in large quantities allows you to unleash your creativity and showcase your unique style.
Glitter-dipped clipboards for a stylish workspace
If you’re looking for creative project ideas to add a touch of sparkle and glamour to your workspace, glitter-dipped clipboards are the perfect solution. Whether you’re a student, professional, or simply someone who loves organization, these glittery accessories will bring style and functionality to your daily tasks.
Add a pop of color
Glitter-dipped clipboards are an excellent way to infuse your workspace with vibrant colors. By choosing different shades of glitter, you can create a personalized clipboard that reflects your unique style. From bold and bright hues to soft and pastel tones, the options are endless. This burst of color will not only make your workspace visually appealing but also uplift your mood and inspire creativity.
Make it personal
One of the best things about glitter-dipped clipboards is their versatility. You can customize them to suit your preferences and personality. Consider adding initials or monograms using vinyl stickers or stencils before applying the glitter. This personal touch will not only make the clipboard uniquely yours but also make it easy to identify among others in shared spaces.
Stay organized in style
Clipboards are practical tools for keeping important documents organized and accessible. However, they don’t have to be boring! With glitter-dipped clipboards, you can elevate their functionality while maintaining an aesthetic appeal. The sparkling surface adds a touch of glamour to an otherwise ordinary office essential.
Spark inspiration
A visually pleasing workspace can significantly impact productivity and motivation levels. Glitter-dipped clipboards provide just the right amount of sparkle to ignite inspiration during mundane tasks or long study sessions. The shimmering surface acts as a visual cue that stimulates creativity and encourages focus on the task at hand.
Versatility at its best
Glitter-dipped clipboards offer more than just a stylish addition to your desk; they are versatile tools that serve multiple purposes beyond holding papers. You can use them as a decorative display for inspirational quotes, photos, or artwork. They can also double as mini whiteboards for jotting down quick notes or reminders using dry erase markers.
Easy to create
Creating glitter-dipped clipboards is a fun and straightforward DIY project that anyone can do. All you need are some basic supplies like clipboards, glitter, Mod Podge (a popular crafting adhesive), and a paintbrush. Simply apply the Mod Podge to the surface of the clipboard, sprinkle glitter over it, and let it dry. Repeat this process until you achieve your desired level of sparkle.
Glitter-dipped clipboards are not only practical but also add a touch of glamour to any workspace.
Make a lace crown fit for a princess with added sparkle
Lace Crown: A Regal DIY Project
Looking for a creative project idea that will make you feel like royalty? Why not try making a lace crown fit for a princess? This DIY project combines the elegance of lace with the sparkle of glitter, resulting in a regal accessory that is perfect for dress-up, parties, or even just adding a touch of glamour to your everyday life.
Materials Needed
To create your own lace crown, you’ll need a few simple materials. First and foremost, you’ll need some lace fabric. Choose a lace design that speaks to your personal style – whether it’s delicate and floral or bold and geometric. Next, gather some glitter in large quantities. You can find glitter in various colors and sizes at craft stores or online. Other materials include scissors, glue (fabric glue works best), and any additional embellishments you’d like to add to your crown, such as rhinestones or beads.
Step-by-Step Instructions
- Start by measuring the circumference of your head using a soft measuring tape. This will ensure that your lace crown fits comfortably.
- Cut out a strip of lace fabric that matches the measurement of your head circumference.
- Lay the strip of lace flat on a clean surface and apply fabric glue along one edge.
- Sprinkle glitter generously over the glued section of the lace strip, ensuring full coverage.
- Allow the glue to dry completely before gently shaking off any excess glitter.
- Fold the lace strip into a circular shape, overlapping the ends slightly to create a seamless look.
- Apply more fabric glue to secure the overlapped ends together.
- Once again, sprinkle glitter over the glued area and let it dry completely.
- If desired, add extra embellishments such as rhinestones or beads using fabric glue.
- Allow the crown to dry completely before wearing and enjoying your regal creation.
Sparkle with Confidence
Creating a lace crown with added sparkle is not only a fun and creative project, but it also allows you to express your unique style and personality. Whether you’re channeling your inner princess or simply looking for a way to add some glamour to your life, this DIY project is sure to make you feel like royalty. So go ahead, gather your materials, and let your creativity shine!
DIY thumbtacks transformed into eye-catching accessories with glitters
If you’re looking for a fun and creative project idea that allows you to add some sparkle to your everyday items, why not try transforming ordinary thumbtacks into eye-catching accessories using glitter? This simple and inexpensive DIY project can instantly add a touch of glamour to your bulletin boards, corkboards, or even your workspace. Here are some creative ideas and inspiration for using glitter bought in large quantities.
Personalize Your Bulletin Board
One way to make your bulletin board stand out is by adding a personal touch with glitter thumbtacks. Choose a color palette that matches your room decor or opt for a mix of vibrant colors to create a playful look. By replacing regular thumbtacks with glitter ones, you can turn your bulletin board into a stylish focal point that reflects your personality.
Organize in Style
Who said organizing has to be boring? Use glitter thumbtacks to add a pop of color and sparkle to your organization system. Whether you’re pinning up important notes, reminders, or inspirational quotes on a corkboard or wall grid, these glitzy thumbtacks will make the task more enjoyable. Plus, they’ll serve as functional decor that brightens up your space.
Create Unique Jewelry Displays
If you’re an avid jewelry collector or have a small business selling handmade accessories, glitter thumbtacks can be an excellent way to create unique and eye-catching jewelry displays. Attach them to a corkboard or foam sheet and arrange your necklaces, bracelets, and earrings on them. The glimmering thumbtacks will not only showcase your jewelry beautifully but also add an element of whimsy to your display.
Customized Photo Displays
Give your photo display an extra touch of glam by incorporating glitter thumbtacks. Whether it’s a string of fairy lights with photos attached or a traditional corkboard gallery wall, swapping out regular thumbtacks for glitter ones will instantly elevate the look. Choose a color that complements your photos or opt for a mix of shades to create a vibrant and personalized display.
Fun and Functional Magnets
If you have a magnetic board or refrigerator, turn ordinary magnets into fun and functional accessories with glitter. Apply a coat of adhesive or Mod Podge to the surface of the magnet and sprinkle glitter over it. Once dry, you’ll have dazzling magnets that can hold up important notes or artwork on your fridge while adding a touch of sparkle to your kitchen.
Conclusion
Transforming ordinary thumbtacks into eye-catching accessories with glitter is a simple yet creative project that allows you to add some sparkle to your everyday items. Whether you’re personalizing your bulletin board, organizing in style, creating unique jewelry displays, customizing photo displays, or making fun and functional magnets, glitter thumbtacks can instantly add a touch of glamour to any space. So grab some glitter, gather your supplies, and let your creativity shine!